EasyMega Documentation
In this article:
Features
- Works with Customizer system.
- Live view.
- Drag and drop Mega Menu builder.
- Magazine layout.
- Builder content layout.
- Add widget in your menu content (Pro version).
- Extend menu from theme.
- Custom responsive break point.
- 6 animations: shift-up, shift-down, shift-left, shift-right, fade, flip.
- Full with layout.
- Boxed layout.
- Custom mega menu content width.
- Align menu items to the left or right of the menu bar
- Align sub menus to left or right of parent menu item.
Installation
Just go to Plugin -> Add new then search with keyword "EasyMega" then hit Install Now button.
If you want to install manual, just download the EasyMega plugin form WordPress.org
See more detail about WordPress Plugin Installation here.
Create a Menu
Defining a Menu
You must define a menu before you can add items to it.
- Login to the WordPress Dashboard.
- From the 'Appearance' menu on the left-hand side of the Dashboard, select the 'Menus' option to bring up the Menu Editor.
- Select Create a new menu at the top of the page
- Enter a name for your new menu in the Menu Name box
- Click the Create Menu button.
Adding Items to a Menu
You can add different link types into your menu, these are split between panes left of the menu you're currently editing.
- Locate the pane entitled Pages.
- Within this pane, select the View All link to bring up a list of all the currently published Pages on your site.
- Select the Pages that you want to add by clicking the checkbox next to each Page's title.
- Click the Add to Menu button located at the bottom of this pane to add your selection(s) to the menu that you created in the previous step.
- Click the Save Menu button once you've added all the menu items you want.
Your custom menu has now been saved.
Note The Screen Options allow you to choose which items you can use to add to a menu. Certain items, like Tags are hidden by default
Deleting a Menu Item
- Locate the menu item that you want to remove in the menu editor window
- Click on the arrow icon in the top right-hand corner of the menu item/box to expand it.
- Click on the Remove link. The menu item/box will be immediately removed.
- Click the Save Menu button to save your changes.
Adding Your Menu to Your Site
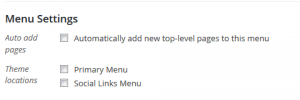
If your current theme supports custom menus, you will be able to add your new menu to one of the Theme Locations.
- Scroll to the bottom of the menu editor window.
- In the section titled Theme locations, click the check box for the location where you want your menu to appear.
- Click Save menu once you've made your selection.
If your current theme does not support custom menus, you will need to add your new menu via the Custom Menu widget in the Appearance Widgets Screen.
More details: WordPress Menu User Guide
Enable Mega Menu
Navigate to: Customize -> Menus -> Select a menu if exists, if not, Just add new, scroll down bottom and check to "Enable mega menu".
Example i have defined menu Primary.

Adding a mega menu item
After Mega menu enabled you can see Mega menu settings button for each menu item.

- Click to Enable mega menu new panel will open.
- Check to option Enable Mega Menu to enable mega menu for this item.

Mega settings options
Enable Mega Menu
Toggle enable disable menu for current item.
Mega Menu Type
Switch between mega content types Columnize Mega Menu and Content Grid Mega Menu.
- Columnize Mega Menu: use simple mega content builder to add content.
- Columnize Mega Menu: Use posts type for defined layout content.
Mega Menu Layout
Select layout for menu layout, it can be Full width or Boxed.
- Full with: Mega layout will width 100% of your browsers.
- Boxed: Based on main layout of your site.
Mega Content Layout
If you Mega Menu Layout is full with you may need set content layout to boxed and full with.
- Full with: Mega content will width 100% of your Mega Menu Layout.
- Boxed: Based on main layout of your site.
You can set Mega Menu Layout full width and Mega Content Layout to boxed to see difference.
Column Heading
This option use for Menu type Columnize Mega Menu. Maybe you need add more heading for you menu columns and you want to display them on mobile only, this option will helpful for you.
Content Width
Set custom width (a number), If you don't want to use full width or boxed layout this option will help you do that.
Content Align
When you use custom Content Width you will need set align for you mega, just set it here. Available aligns: center, left, right.
Adding content to mega menu
Columnize Mega Menu
When you select Mega Menu Type as Columnize Mega Menu, you will see Columnize Mega Menu tab next Settings tab.

- Change number columns.
Support up to 4 columns. Click to left arrow to remove column, Click to right arrow to add more column. - Change column size.
Click to arrow to resize current column. - Add column heading.
Type something for column heading if you want. - Content area.
Items added here. - Add Menu Item to content area.
Click to this link to add menu items. - Add widget to column content area.
Click here to add widget (Available for Pro version only).
Adding an menu item to column.
- Click to Add menu link to add more item to current column.
- Click to any items on Right Side to add menu items (Just like add more menu items on menu customize).
- Click to Left Side to close Right Side.

Editing, Remove an menu item.
- Click to arrow button to explain settings of item, let change what you want.
- Click to remove link to remove item.

Adding a widget to column (Available on Pro version)
Content Grid Mega Menu
When you select Mega Menu Type as Content Grid Mega Menu, you will see Content Grid Mega Menu tab next Settings tab.

Source
You can select any post type here, On free version you can select source as post only.
Taxonomy
Each source (post type) have own taxonomies, example post we have Categories, Tags, Format, ... Just select taxonomy you want.
Terms( Depended to taxonomy selected you will have different term name )
Each taxonomy you will have own terms, example post we have categories example: Fashion, Music, Film,...Just select terms for post type display, Drag added items to sort. By default 2 terms allowed, Upgrade to Pro to add unlimited items.
Column layout
Number post per row to display, you can select 2,3,4 or 6 columns to display.
Number post to show
How many posts you want to display.
Include post
Use post ids. Specify posts to retrieve. ATTENTION If you use sticky posts, they will be included (prepended!) in the posts you retrieve whether you want it or not. Separated by commas(,).
Exclude Post
Use post ids. Specify post NOT to retrieve. If this is used in the same query as include post, it will be ignored. Separated by commas(,).
Order By
Sort retrieved posts by parameter, available: title, date,rand, comment count, post included.
Order
Designates the ascending or descending order of the 'order by' parameter.
Layout
Layout to display, available: tab lefts, tabs right, no tabs.
Show All Item
Add show all item link to tabs layout, You can select add this item on the top or at the bottom of tabs.

Show Posts When
Show posts when you hover or click on the tabs.
Mega Settings
Navigate to Customize -> Menu -> Mega Menu Settings

Disable auto CSS
If you want to use your custom css file just check this.
Mega Wrapper
The width of mega content may get incorrect so you can switch to each parent level until it get correct.
Mobile break points
Each theme have different break points, which enter your site into layout tablet, mobile mod. You can find break point by using responsive testing tools.
Mega content margin top (px)
If your mega content margin top incorrect you can reset it here.
Animation
Select animation for mega content when display.